
| 일 | 월 | 화 | 수 | 목 | 금 | 토 |
|---|---|---|---|---|---|---|
| 1 | 2 | 3 | 4 | 5 | ||
| 6 | 7 | 8 | 9 | 10 | 11 | 12 |
| 13 | 14 | 15 | 16 | 17 | 18 | 19 |
| 20 | 21 | 22 | 23 | 24 | 25 | 26 |
| 27 | 28 | 29 | 30 |
- 수퍼컴퓨터 클러스터
- c언어 static
- 삼성 B형
- 삼성전자 #영상디스플레이사업부 # VD사업부 #면접후기
- softeer
- c언어 지역변수
- c언어 전역변수
- 통근버스 출발 순서 검증하기
- Python
- c언어 라이프타임
- Sparkfun Edge 프로젝트
- 성적평균
- 코테기출
- Sparkfun Edge Example
- 지도 자동 구축
- 플레이페어 암호
- 코딩테스트 기출
- 사물인식 최소 면적 산출 프로그램
- GStreamer tutorial
- Spakrfun Edge
- MacOS 설치
- 소프티어
- C++해설
- GStreamer 튜토리얼
- c언어 스코프
- nodejs 기초
- SKT FLYAI
- GStreamer
- c언어 정적변수
- C++
- Today
- Total
mulll
[GStreamer] 기본 튜토리얼 2 - GStreamer 개념 본문
메인 페이지: https://mulll.tistory.com/23
[GStreamer] GStreamer 이해하기
GStreamer에 대해 포스팅하고자 합니다. GStreamer에 대한 포스팅을 업로드할 때마다 이 페이지를 업데이트할 예정입니다. 대부분의 포스팅은 아래의 GStreamer 공식 문서와 Github를 참고합니다. https://gs
mulll.tistory.com
출처: https://gstreamer.freedesktop.org/documentation/tutorials/basic/concepts.html?gi-language=c
목표
이전 튜토리얼에서는 어떻게 자동으로 파이프라인을 구성하는지 알아보았습니다. 이번에는 각각의 element를 인스턴스화하고 element를 묶어서 파이프라인을 구성하는 방법에 대해서 알아보겠습니다. 이번 시간에는 다음을 학습하게 됩니다.
- GStreamer element가 정확히 무엇이고 어떻게 생성하는지?
- element 끼리 서로 어떻게 연결하는지?
- element의 동작을 어떻게 커스터마이징할 수 있는지?
- 어떻게 오류 상태를 버스에서 확인하고 GStreamer message에서 정보를 가져오는지?
Manual Hello World
basic-tutorial-2.c
#include <gst/gst.h>

#ifdef __APPLE__
#include <TargetConditionals.h>
#endif

int
tutorial_main (int argc, char *argv[])
{
  GstElement *pipeline, *source, *sink;
  GstBus *bus;
  GstMessage *msg;
  GstStateChangeReturn ret;

  /* Initialize GStreamer */
  gst_init (&argc, &argv);

  /* Create the elements */
  source = gst_element_factory_make ("videotestsrc", "source");
  sink = gst_element_factory_make ("autovideosink", "sink");

  /* Create the empty pipeline */
  pipeline = gst_pipeline_new ("test-pipeline");

  if (!pipeline || !source || !sink) {
    g_printerr ("Not all elements could be created.\n");
    return -1;
  }

  /* Build the pipeline */
  gst_bin_add_many (GST_BIN (pipeline), source, sink, NULL);
  if (gst_element_link (source, sink) != TRUE) {
    g_printerr ("Elements could not be linked.\n");
    gst_object_unref (pipeline);
    return -1;
  }

  /* Modify the source's properties */
  g_object_set (source, "pattern", 0, NULL);

  /* Start playing */
  ret = gst_element_set_state (pipeline, GST_STATE_PLAYING);
  if (ret == GST_STATE_CHANGE_FAILURE) {
    g_printerr ("Unable to set the pipeline to the playing state.\n");
    gst_object_unref (pipeline);
    return -1;
  }

  /* Wait until error or EOS */
  bus = gst_element_get_bus (pipeline);
  msg =
      gst_bus_timed_pop_filtered (bus, GST_CLOCK_TIME_NONE,
      GST_MESSAGE_ERROR | GST_MESSAGE_EOS);

  /* Parse message */
  if (msg != NULL) {
    GError *err;
    gchar *debug_info;

    switch (GST_MESSAGE_TYPE (msg)) {
      case GST_MESSAGE_ERROR:
        gst_message_parse_error (msg, &err, &debug_info);
        g_printerr ("Error received from element %s: %s\n",
            GST_OBJECT_NAME (msg->src), err->message);
        g_printerr ("Debugging information: %s\n",
            debug_info ? debug_info : "none");
        g_clear_error (&err);
        g_free (debug_info);
        break;
      case GST_MESSAGE_EOS:
        g_print ("End-Of-Stream reached.\n");
        break;
      default:
        /* We should not reach here because we only asked for ERRORs and EOS */
        g_printerr ("Unexpected message received.\n");
        break;
    }
    gst_message_unref (msg);
  }

  /* Free resources */
  gst_object_unref (bus);
  gst_element_set_state (pipeline, GST_STATE_NULL);
  gst_object_unref (pipeline);
  return 0;
}

int
main (int argc, char *argv[])
{
#if defined(__APPLE__) && TARGET_OS_MAC && !TARGET_OS_IPHONE
  return gst_macos_main (tutorial_main, argc, argv, NULL);
#else
  return tutorial_main (argc, argv);
#endif
}
컴파일 및 실행
gcc basic-tutorial-2.c -o basic-tutorial-2 `pkg-config --cflags --libs gstreamer-1.0`

./basic-tutorial-2
Walkthrough
element는 GStreamer의 기본 블록이다. 데이터의 흐름은 downstream 방향으로 source element에서 sink element로 흐르며 중간에 filter element를 거친다.

Element creation
tutorial-1 에서 아래의 초기화 부분은 다루었기 때문에 넘어가겠다.
  /* Initialize GStreamer */
  gst_init (&argc, &argv);
아래 코드에서 볼 수 있듯이 새로운 element들은 gst_element_factory_make()를 통해 만들어질 수 있다. 첫번째 파라미터의 경우 새로 만들 element의 type을 지정해준다. 다양한 타입은 basic-tutorial-14: Handy elements에서 볼 수 있다. 두번째 파라미터의 경우 우리가 특정 인스턴스에 주고싶은 element 이름이다. element에 이름을 설정하면 나중에 pointer와 같은 요소를 쓰지 않고도 유용하게 element를 다시 찾고 사용할 수 있다. 이름을 주지않고 NULL로 설정해도된다. 하지만 element의 이름이 중복되어서는 안된다.
  /* Create the elements */
  source = gst_element_factory_make ("videotestsrc", "source");
  sink = gst_element_factory_make ("autovideosink", "sink");
이번 튜토리얼에서는 videotestsrc와 autovideosink 두 element를 생성해볼 것이다. 여기서는 filter element는 존재하지 않는다. 그래서 파이프파인은 아래와 같이 구성이 된다.
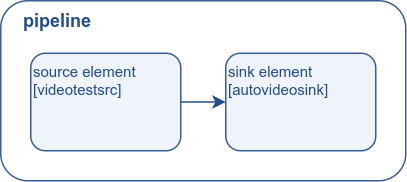
videotestsrc는 source element로 데이터를 생성하는 요소이며 테스트 비디오 패턴을 생성한다. 이 source element는 디버깅 목적과 튜토리얼 목적에 유용하다. 실제 어플리케이션에는 사용되지 않는다.
autovideosink는 sink element로 데이터를 받는 요소이며 화면 창에 받은 데이터를 띄워준다. videosink는 많은 video sink가 존재하며 운영체제(operating system)에 의존적이며 다양한 능력을 가지고 있다. autovideosink는 자동으로 가장 best한 videosink를 선택하고 element화한다.
Pipeline creation
모든 GStreamer element는 pipeline 내부에 포함되어있어야한다. 먼저 pipeline을 gst_pipline_new()를 통해 생성해보자.
  /* Create the empty pipeline */
  pipeline = gst_pipeline_new ("test-pipeline");

  if (!pipeline || !source || !sink) {
    g_printerr ("Not all elements could be created.\n");
    return -1;
  }
아래 코드는 파이프라인을 연결하는 코드이다. 파이프라인은 bin의 특정한 타입이며 bin은 element를 다른 element에 포함한다. 따라서 빈에 적용되는 모든 방법들이 파이프라인에 적용이 됩니다.
  /* Build the pipeline */
  gst_bin_add_many (GST_BIN (pipeline), source, sink, NULL);
  if (gst_element_link (source, sink) != TRUE) {
    g_printerr ("Elements could not be linked.\n");
    gst_object_unref (pipeline);
    return -1;
  }
이번 tutorial의 경우 우리는 gst_bin_add_many()가 pipeline에 element들을 추가해준다고 생각할 수 있다. 이 함수에는 element를 모두 넣고 마지막에 NULL을 넣음으로써 element가 다 추가되었음을 알린다.
아직 element들이 서로 연결되지는 않았다. 연결을 위해서는 gst_element_link()를 사용해야한다. 첫번째 parameter는 source가 되고 두번째 parameter에는 목적지가 된다. 이때 parameter의 순서에 따라 data flow가 생성되기 때문에 paramter의 순서가 중요하다. 여기서는 source element부터 sink element로 데이터가 이동한다. 또한 같은 bin에 존재하는 element 끼리만 서로 연결될 수 있다. 그러므로 element 끼리 서로 연결하기 전에 gst_bin_add_many를 통해 bin에 element를 등록해야한다.
Properties
대부분의 GStreamer element 들은 커스터마이징 가능한 property 들을 가지고 있다. 이 property는 element의 동작을 수정할 수 있게해주며 내부 상태를 확인할 수 있게해준다.
Property 는 g_object_get() 으로부터 읽을 수 있고 g_object_set()으로부터 쓸 수 있다.
아래 코드를 보면 g_object_set() 는 NULL로 끝나는 (property-name, property-value) 쌍으로 입력이 주어져 여러 property 들이 한 번에 수정될 수 있다.
  /* Modify the source's properties */
  g_object_set (source, "pattern", 0, NULL);
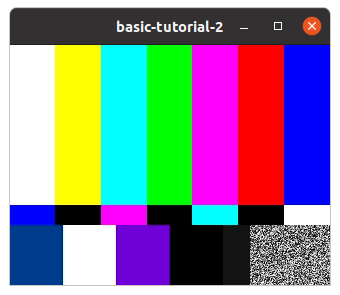
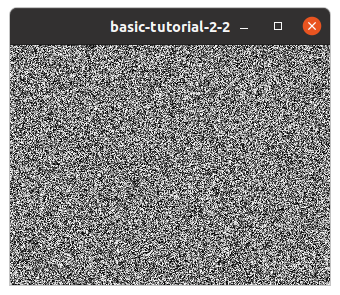
위의 코드는 videotestsrc의 "pattern" 속성(property)을 바꾸는데 pattern 속성은 test video에 어떤 화면을 보여줄지를 결정한다. 위의 코드에서 property-value가 0이 아닌 다른 값으로 시도해보면 다른 화면이 보여지게된다.
property-name과 설정가능한 property-value는 gst-inspect-1.0 tool 을 사용하여 확인을 할 수 있다. 자세히는 Basic tutorial 10: GStreamer tools 에서 확인 가능하며 videotestsrc property의 경우 여기서 문서로 확인할 수 있다.
Members
....
Error Checking
이번에는 전체 pipeline을 빌드하고 setup 해볼 것이다. 그리고 남은 튜토리얼은 이전 튜토리얼과 아주 유사한데 더 많은 error checking 을 해줘야한다.
  /* Start playing */
  ret = gst_element_set_state (pipeline, GST_STATE_PLAYING);
  if (ret == GST_STATE_CHANGE_FAILURE) {
    g_printerr ("Unable to set the pipeline to the playing state.\n");
    gst_object_unref (pipeline);
    return -1;
  }
우리는 gst_element_set_state()를 부르지만, 이번 시간에는 이 함수의 error checking을 위한 리턴값을 확인해본다. state를 바꾸는 것은 섬세한 과정이며 꽤 많은 세부사항들이 주어진다. 세부사항에 대해 자세한건 Basic tutorial 3: Dynamic pipelines.에서 확인 가능하다.
  /* Wait until error or EOS */
  bus = gst_element_get_bus (pipeline);
  msg =
      gst_bus_timed_pop_filtered (bus, GST_CLOCK_TIME_NONE,
      GST_MESSAGE_ERROR | GST_MESSAGE_EOS);
gst_bus_timed_pop_filtered() 는 실행이 종료될 때까지 기다리며 이전에는 무시되었던 GstMessage를 return 한다.
GstMessage는 GStreamer가 마주친 에러나 EOS(end of stream) 정보를 가지며 이를 통해 실행이 종료되었을 때 실행 결과를 확인할 수 있다.
  /* Parse message */
  if (msg != NULL) {
    GError *err;
    gchar *debug_info;

    switch (GST_MESSAGE_TYPE (msg)) {
      case GST_MESSAGE_ERROR:
        gst_message_parse_error (msg, &err, &debug_info);
        g_printerr ("Error received from element %s: %s\n",
            GST_OBJECT_NAME (msg->src), err->message);
        g_printerr ("Debugging information: %s\n",
            debug_info ? debug_info : "none");
        g_clear_error (&err);
        g_free (debug_info);
        break;
      case GST_MESSAGE_EOS:
        g_print ("End-Of-Stream reached.\n");
        break;
      default:
        /* We should not reach here because we only asked for ERRORs and EOS */
        g_printerr ("Unexpected message received.\n");
        break;
    }
    gst_message_unref (msg);
  }

  /* Free resources */
  gst_object_unref (bus);
  gst_element_set_state (pipeline, GST_STATE_NULL);
  gst_object_unref (pipeline);
  return 0;
GstMessage가 NULL이 아니라면 screen에 message를 출력해준다. 또한 gst_message_parse_error()를 통해 디버깅을 위한 정보 또한 리턴한다.
The GStreamer bus
GStreamer bus는 elements로부터 생성된 GstMessage를 순서대로 전달해주는 역할을 한다. Message 는 gst_bus_timed_pop_filtered()에서 동기화되어 추출될 수 있다. 비동기적으로는 signals을 사용하여 (다음 튜토리얼에 자세하게 설명됨) 여러분의 어플리케이션에 동기적으로 재생에 관련된 문제나 버스에서 생성된 Message 를 볼 수 있다.
Exercise
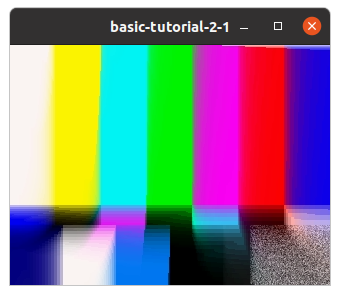
연습을 해보고 싶다면 필터를 거치는 기능을 추가해보자: video filter element를 source와 sink 사이에 추가하고 파이프라인에 추가해본다. 필터로는 vertigotv element를 사용하여 추가해보도록 한다. 여러분은 element를 만들고 pipeline에 추가하고 이를 다른 element와 연결해주는 작업을 추가로 해줘야 한다.
개별 환경과 이용가능한 플러그인에 의존하여 negotiation error를 만날수도 있다. sink는 filter를 인식할 수 없기 때문이다. negotiation에 관한 자세한 것은 Basic tutorial 6: Media formats and Pad Capabilities 에서 확인가능하다. 이 경우에는 videoconvert element를 filter와 sink 사이에 추가하여 파이프라인을 구성해본다. 그러면 pipeline에는 총 네 개의 element로 구성이 될 것이다. videoconvert에 대한 자세한 정보는 videoconvert에서 확인가능하다.
Excercise 코드 수정 결과
...
  /* Create the elements */
  source = gst_element_factory_make ("videotestsrc", "source");
  filter = gst_element_factory_make ("vertigotv", "filter");                          // modified
  videoconvert = gst_element_factory_make ("videoconvert", "convert");                // modified
  sink = gst_element_factory_make ("autovideosink", "sink");

...

  if (!pipeline || !source || !sink || !filter || !videoconvert) {                    // modified
    g_printerr ("Not all elements could be created.\n");
    return -1;
  }

  /* Build the pipeline */
  gst_bin_add_many (GST_BIN (pipeline), source, filter, videoconvert, sink, NULL);    // modified
  if ((gst_element_link (source, filter) && gst_element_link (filter, videoconvert) && gst_element_link(videoconvert, sink)) != TRUE) {
    g_printerr ("Elements could not be linked.\n");
    gst_object_unref (pipeline);
    return -1;
  }

...
Conclusion
이번 튜토리얼에서는
- 어떻게 gst_element_factory_make()를 통해 element를 만드는가?
- gst_pipeline_new()로 empty pipeline을 생성하는가?
- gst_bin_add_many()로 어떻게 pipeline에 element들을 추가하는가
- gst_element_link()로 element들을 서로 연결하는가?
'GStreamer' 카테고리의 다른 글
| [GStreamer] 기본 튜토리얼 1 - Hello World Screen을 띄어보자 (0) | 2023.01.07 |
|---|---|
| [GStreamer] Ubuntu 설치 (0) | 2023.01.05 |
| [GStreamer] MacOS 설치 (0) | 2023.01.05 |
| [GStreamer] GStreamer 이해하기 (0) | 2023.01.05 |


